


The Battle of Jones Junction, Virginia
An After Action Report of an American Civil War Wargame with Die Fighting!
Introduction
Die Fighting! Is the latest wargame design from Bob Jones. Quite the departure from many of the core concepts of Piquet and Repique, Die Fighting is a fun game with the flavor of classic wargaming.
Disclaimer
Yes, I am a play tester for the Die Fighting rules. Yes, I am a friend of the author. No, this is not a review of the rules. Yes, I enjoy a good game well played amongst gentlemen (preferably with one or more IPA’s or a little scotch - or both). What I am trying to do with this report is share a playtest game experience and in so doing, share some of the rules concepts within the context of the game. I hope to pass on the “flavor” of the game; judgments are – as always – left up to our own specific tastes and experiences.
The Scenario
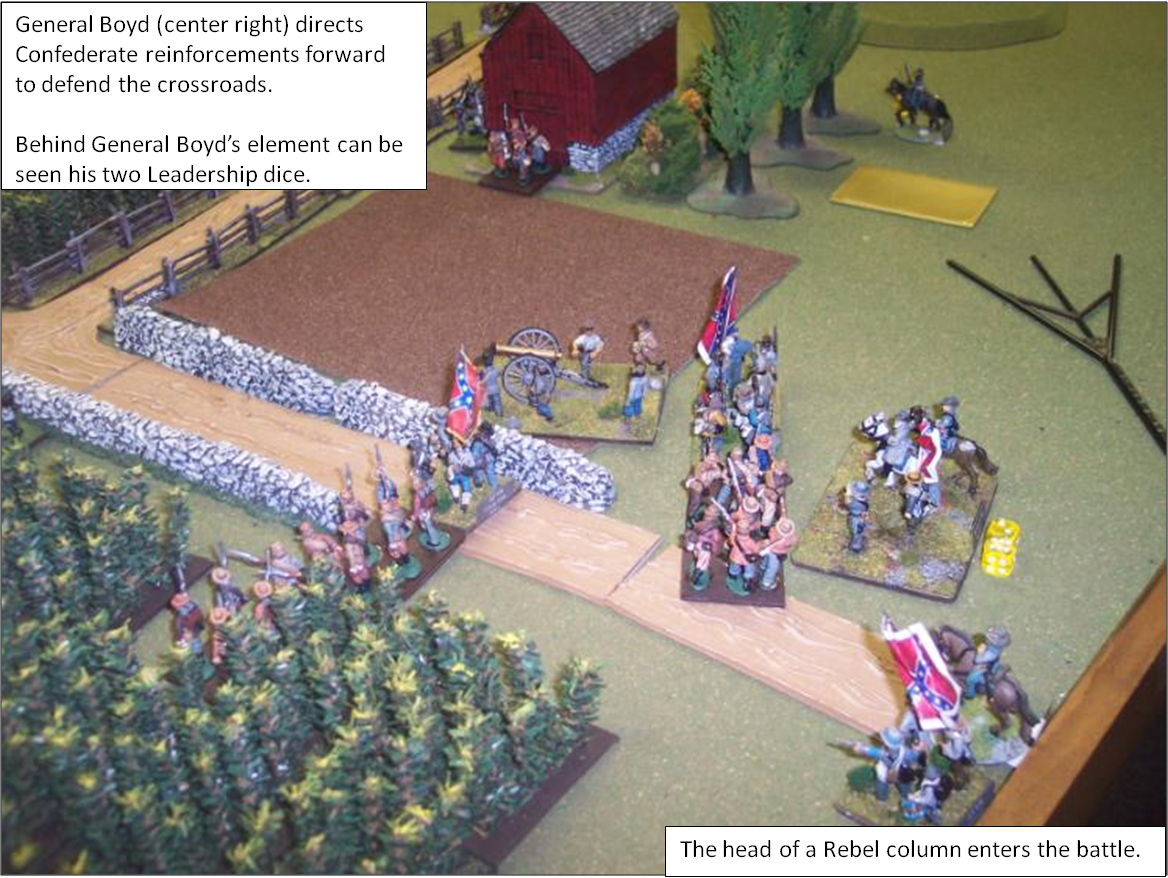
In the late summer of Gettysburg, as the armies danced and jockeyed for position, many small skirmishes took place. On a particularly hot day, in central Virginia, the pickets of a Federal corps encountered a rebel detachment holding a crossroads near the farm of an ardent Unionist family.
Below is a map of the battlefield. The squares on the map are 12” boxes. I am sure that you can deduce the presence of wood rail fences and stone walls as well as wooded areas and cornfields. The other field types are furrowed and wheat.
The yellow circles with numbers represent the “victory dice value” of the locations. As you’ll see while reading this report, the competing armies have a pool of “resources” (represented by dice) to use during the battle, when you capture a victory location that does not begin the game in your zone of control (so to speak) you add that number of resources to your pool. Naturally, if the enemy recaptures it from you, he is awarded the same resource value, and so on every time a location changes hands.
 |
| Click to Enlarge |
To begin the battle, the Confederates will place one brigade on the table, anywhere on the Southern half (no artillery).
The Union forces will then place two brigades on the board anywhere on the Northern half, but no closer than 12” to the enemy (no artillery).
The remaining forces are to enter the table on the respective player’s turns, at will, along either of the roads that terminate in their half of the table.
The crossroads begins the game in the Confederate zone of control in terms of victory points.
The Forces
For the battle, the following forces were used. This scenario is decidedly small, as we only have a handful of hours on a Friday night available to us. Of course, we’re well provisioned with pizza and beer and fun comrades. What better to do on a cold winter night than imagine a hot Virginia afternoon!
A note about the unit sizes and basing for the game: it doesn’t really matter. A “regiment” will have four elements of miniatures. My 28MM ACW forces are based with 4 miniatures on a 2X2 square. For my ACW games, in introduce an optional rule that regiments can also be rated “small” (3 elements) or “large” (5 elements) with requisite combat effects. In this particular game, no units were rated as small or large for simplicity.

From the above Confederate roster, you can see typical unit ratings for a wargame: armament, quality rating, and unit designation. What is different are the Leadership Dice for leaders and Resource Dice for units.
I think that Leadership Dice are quite interesting. Leadership dice are used during the turn at the discretion of the player to augment various die rolls. Once used, they are lost for the remainder of the turn but are replenished each turn. One of the interesting things is that you roll for initiative in each phase (a turn consists of six different phases) using your unused Leadership Dice! So, having your leaders get more involved in tactical issues can hurt you strategically.
But, let’s focus on the Resource Dice. As you are rating your forces, by rolling two dice per unit, the result of the dice also indicates how many Resource dice that a unit contributes to the “pool”. This does not mean that the unit has resources, or carries resources – it is simply a mechanism to allocate a number of resources in proportion to the size and quality of the army. Resources are the lifeblood of the army in this game system, as I quote the author:
The core idea behind Die Fighting is that each army gets a certain number of dice, depending on the army’s size, and the types of units. They may use these dice to move, maneuver, fire their weapons, melee, and rally, but they can only use each die once, and then it is discarded from play. When an Army runs out of dice, they may no longer do these things, and if they run out before the enemy, the game is over and they have lost the game.
When conducting actions, a unit must expend at least 1 and optionally more (usually no more than 2 total) Resource Dice. In addition, certain conditions allow you to have extra, non-resource, dice added. These are called Free Dice. For example, let us imagine a unit in attack column that is advancing over some open terrain. The unit must use 1 Resource die and can use 2. In addition, the attack column formation allows 1 Free Dice (march-column adds 2 Free Dice). So the unit could roll up to 3 dice and move the number of pips shown on the dice. Of course, terrain features can cause deductions and you are not typically required to move the full distance. After the unit has rolled and moved, the number of Resource Dice that were used is removed from the pool.
Ok, enough of that, how about the Yankee roster? Here it is:

You can see that the Yankees have a larger force and a larger pool of Resource Dice. They should certainly be able to sustain the attack. Of course, attacks can be costly, so we’ll see who comes out ahead in the end!
Turn Sequencing
In Die Fighting, as mentioned above, there are six phases to each turn. The phases are, in the order of their sequence are: “All Other Actions”, “Officer Action”, “Cavalry Action”, “Infantry Action”, “Artillery Action” and “Rally, Reload, Restore”.
What’s interesting is that besides the standard sequence of actions in a turn, you have the option to play the sequence in other ways. For the course of this battle, we’re going to allow the players to select what phase is next – choosing a phase only once per turn. Also, the two armies can be executing completely different phases! The Yankees could choose “Officer Action” while the Confederates could choose “Artillery Action”! Whoever wins the initiative roll for the phase executes first!
Ok, time to battle. I better open a brew and grab a slice of pizza…
The Battle
Once arrived for battle, Bob tossed a little fog of war onto us. He stated that one Union and one Confederate cavalry unit are off board and will enter the game at his discretion, not the player’s. Given the nature of cavalry in 1863, this seemed fair to all of us.
Deployments
So, to begin the game, the Confederates deployed one brigade on the table. General Boyd placed some of General Boudreaux’s infantry near the crossroads and in the Jones Farm, but also placed his artillery and two of the infantry regiments on the hill. The good general’s intention was to capture the “end” of the road, gain the additional Resource Dice and delay the arrival of any Federal reinforcements that may enter there.

After the Confederate deployment completed, the Union command placed two infantry brigades on the board’s northern edge, straddling the road but thicker on the west side. Clearly the Yankees appeared ready to force the crossroads. Since the Union could only begin the battle with two brigades, they decided to keep General Tucker’s brigade and the artillery (brigaded together) off the table.


To begin the game, we needed to determine which side had the initiative and what phase each side would start with. So, each side selected a card and placed it face down.

Then, each commander rolled the number of Leadership Dice available to them by virtue of the leaders on the table. This meant that the Yankees rolled 6 dice (Henry, Daniels and Fraser) while the Confederates rolled 5 dice (Boyd and Boudreaux). The leadership advantage at this time was slightly on the Federal side, but the total of the two die rolls favored the Confederacy.
The Confederacy decided to play first this phase and revealed their card, “Infantry Action”. As expected, this allows infantry units to maneuver. Immediately, General Jones’ (no relation to the local family) begin to lead his troops onto the table and towards the crossroads. Bob had determined that the units were in march-column along the road, with the artillery unit in the rear of the column. Movement is conducted by expending Resource Dice, a base of 2 Dice per unit moving. Since the troops were in march-column, they also received 2 Free Dice. So, we rolled four dice and moved the first unit onto the board, expending 6 inches of movement along the way to change into line formation. This was repeated as other units of the brigade made it onto the table this turn and next.
With the arrival of General Jones, the Rebels gained his two Leadership Dice, raising their total to 7 and giving the Southerners the advantage in this area until more Yankee generals come onto the table.
From the hill, two of General Boudreaux’s units moved towards the road to cut it off. This was bold, as any Yankees entering here would outnumber the Rebels, but the General could not resist the free Resource Dice he would earn by capturing the roadway.
No Rebels moved into the shooting range of any Yankees, so the phase ended and we moved onto the Federal’s portion of this phase. The card they had selected is now revealed and was “Cavalry Action”. As no cavalry units were on the table, and Bob did not yet allow the Union cavalry onto the table, this was effectively a “pass” for the Yankees.
Interestingly all of the phases of the first several turns proved the Federal troops to be quite slow in moving and they chose not to commit those troops not yet on the board. Slowly, on their “Infantry Action” cards, the boys in blue moved forward…but never moved aggressively…allowing the Rebels ample time to consolidate their position at the crossroads.
Unknown to the Confederate players at the time, the Union plan of battle involved the center (Fraser’s Third Brigade) advancing just enough to engage the Rebels in a fire fight at the crossroads while the more troops (Daniels’ Second Brigade) moved up on the exposed western flank of the Rebels. Once in position, the remainder of the troops would enter the board and a concerted attack would begin.
What looked like dawdling to us Confederates was actually difficulty on the Union side. The terrain being moved through by Daniels’ brigade involved crossing a couple of wood-rail fences and a significant area of wheat field. Here is where an interesting game mechanic comes in, terrain effect. You see, the fences and fields were “Type 1” terrain (clear terrain is “Type 0”). So when rolling dice for movement distance, any result of “1” is lost. To exacerbate things, the Union commander had formed his men into Line formation, which receives no Free Dice for movement. So the player was rolling 2 dice, and losing any result of “1” and moving the balance. It just happened, as it may, that a large number of “1’s” were being rolled! Conversely, my Rebels moving through a nearby cornfield (also Type 1) never saw a “1” on the dice!
(Side note: The very next day, at our weekend club mini-convention, I played in a “De Bellis Napoleonicus” tournament and counted four consecutive turns where I rolled a “1” for PIPs…so, it does happen! The Gods of War are indeed fickle.)
So, had the Yankees stayed in march-column (until a little closer) or even an attack column they would have received 1 or 2 additional Free Dice to help them move more quickly. This makes it a good time to mention another interesting game mechanic: “multiples”. If, during a die roll for moving, shooting and close combat, multiple dice roll the same value, they can be re-rolled at the player’s option and the new score kept. For example, if you are rolling 3 dice and two of them are “2” (let’s say the third die is a “5”) you may choose to reroll those “2’s” hoping to improve upon the current total of “9”. One unit did roll two “1’s” during this time, but could not reroll them being in Type 1 terrain (where “1’s” are lost) and moved zero inches that phase.
What this means is that the Union brigade made slow progress (consuming 2 Resource Dice per unit per movement) and by not being in a formation more conducive to movement reduced the number of dice being rolled and reduced the opportunity to roll multiples. In theory, being in the right formation at the right times is rewarded by the game system. From column, the Yankees could have gotten through the terrain in fewer turns and used less resource dice.

Phony War
During this period of slow movement, the Rebels engaged in some long range artillery fire as well as some lighter infantry firefights. While successful, we did not really cause the loss of enough Resource Dice to justify the long range shooting we did.
You see, firing costs a unit 2 Resource Dice too, and can be augmented by Free Dice. Defending units also roll 2 Resource dice with potential Free Dice added. If the shooter’s total die roll value is greater, then the difference in the rolls is the effect on the loser in terms of lost Resource Dice and/or fallback movement.
In the game, you may shoot at any time you wish, even on the other side’s phase. But you cannot fire again until the passage of the next “Rally, Reload, Restore” Phase. Similar to Piquet and Repique, when a unit shoots, mark it with cotton puffs (or similar) to signify that it has recently fired. The “smoke” can then be removed during the just mentioned phase.

During thie period, General Boudreaux’s boys captured the roadway, earned 15 more Resource Dice and prepared to defend themselves should any Yankees come this way.
The Boom Is Lowered

The Union commander finally decided that the time had come and brought in both Tucker’s brigade and the artillery on the roadway being held by one Confederate regiment. Naturally, that regiment was shattered in the process and a nearby supporting regiment was also being roughly handled. In recapturing the roadway, the Union gained the 15 Resource Dice.

Combined with a now steady advance by Daniels brigade, the Rebel cause was doomed and the end of the Resource Dice came for the Confederates – ending the game.


At this point we decided to tally up the points (there is a scoring method within the rules) to see how badly things went. Well, they didn’t go that bad for the Confederates. We did not have a lot of eliminated units, we simply used up all our Resource Dice before the enemy did – at certain times we actually wasted some of them. Points can be equated with Resource Dice, and, when you consider that the Yankees had 60 more dice and won by a difference of 61 dice when all was said and done, the Rebs didn’t do too bad. They held their own, neither side getting the better of the other in terms of points, but the Union forces did cause the Rebels to abandon the crossroads.
Mrs. Jones may have lost her fine china to a Texas infantryman, but she nevertheless welcomes the Northern soldiers with warm bread and corn from her fields.
Some Ending Thoughts
Oddly enough, due to the initially slow Union advance and the overwhelming firepower that eventually arrived on the field, we never had a single charge in this particular engagement! As the firefights picked up and Union numbers began to tell, the Rebels simply ran out of the elan to contest the crossroads any more (Resource Dice).
Oh, no cavalry units ever made it to the fight. We Rebs could have used ours…but…knowing Stuart’s boys, they were out burning Yankee supply wagons somewhere.
Decisiveness…this game is decisive. The Resource Dice, besides being the currency of game play, provides a clear ending point for games. Sometimes we gamers want to battle on forever with that last regiment, not with Die Fighting.
Well, that’s all I have for the moment. I hope you enjoyed the read, I hope it was not too confusingly written!
Happy gaming y’all!
No comments:
Post a Comment