


The hospitality of the CSGA was incredible! They are terrific gamers and gentlemen, and provided lunch for members of both clubs! Unfortunately, the first tournament was lost by the CHM club by a score of 321 to 250, but all had much fun. We members, of both clubs, owe much to the Presidents of the respective organizations and the two coordinators from the respective clubs. Our club president is Dan Gurule and our organizer was Brigadier-General John Brown (Ret.).
Those of us playing in the big battle games played one game while those members playing one-on-one match ups played three games each. But it is one particular big battle game that I shall write about here, as it is the battle I participated in…the Battle of Hydaspes.
My gaming partner for the battle was General Brown and we played the Indians while we gamed against David and Doug from the Colorado Springs club (I believe that Doug was the organizer for that club) who ably represented Alexander’s Macedonians.
At the last CMH Sunday meeting, we played two practice rounds of the scenario, as we had decided upon out initial deployment and prepared to test it. In each round of our practice, we depicted a different theoretical Macedonian deployment. The first game was a smashing Indian victory. We theorized a Macedonian “grand battery” to defeat our elephants and a massive phalanx attacking our camp. The second was a closer-fought Indian victory that involved a larger dispersal of artillery and a holding action while a large phalanx attacked the Indian camp. Given these two battles, frankly, I thought that the Greeks had no shot at winning!
I must say at this point, after having played two games with the general, he’s an exceptional player – as one would expect a real general to be. He’s very analytical of the layout and easily grasps situations and acts accordingly. He’s really fun to play with, teaches well, and is an outstanding person – as we’d expect a West Point graduate to be. Thanks for the fun General Brown!
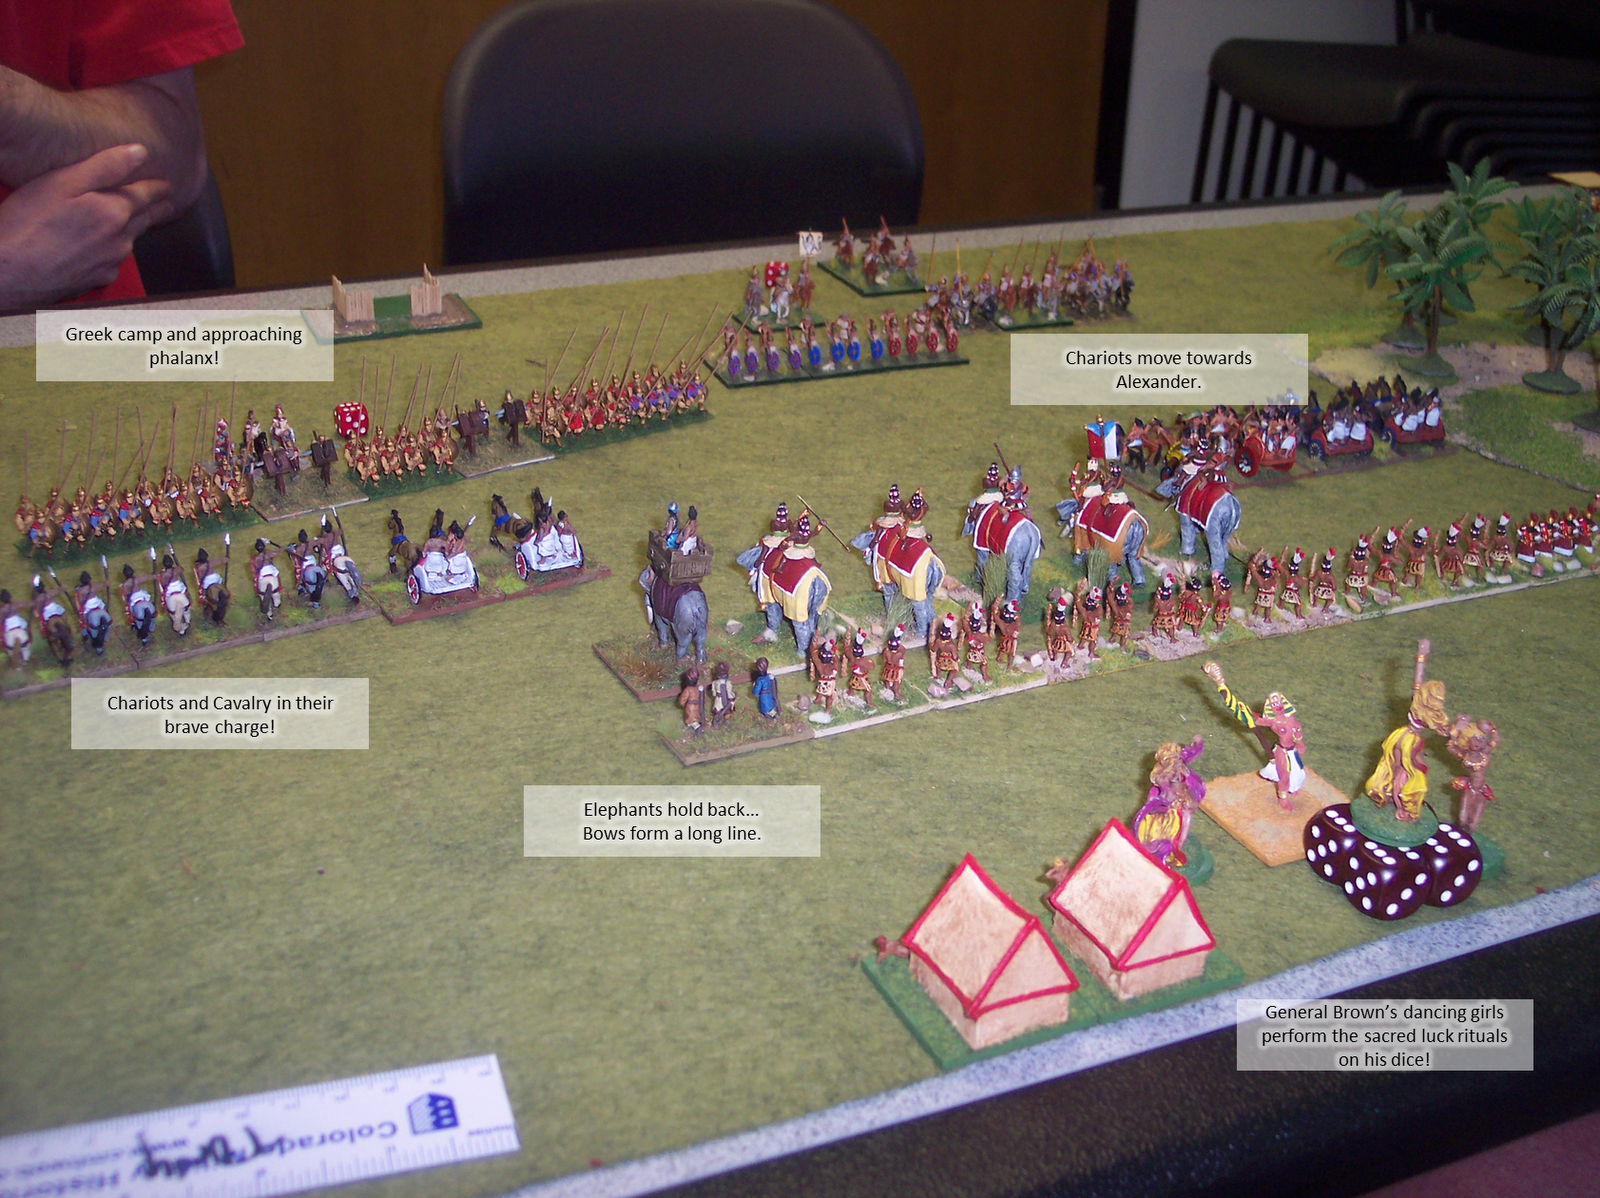
Initial Deployments
Switching context back to Colorado Springs, the battlefield was set up as illustrated below. The location of the swamp (shown at upper left) was diced for so that it was randomly located. Luckily for both armies, it landed in a harmless location.
 |
| Starting Battlefield |
 |
| Initial Deployments |
Before I get into what the commands were consisted of, let me point out that the Macedonians had already thrown us a curve. They did not deploy any commands past the wooded hill! We had not considered this in our practice games! Now we have an isolated command that has much terrain – some of it bad going – to get into the battle!
Commands
OK, what did the commands consist of (I may be slightly off on exact numbers, but you’ll have the read on the feel for the commands)? Let’s start with the Macedonians. Command 3 consisted of 6 pike, 1 artillery and 1 knight general. Command 2 consisted of 2 artillery, 10 pike and 1 knight general. Command 1 consisted of 3 auxilia, 3 psiloi, 2 light horse, 3 knight and 1 knight general (Alexander).
The Indian commands were as follows. Command 3 consisted 9 bow (including one bow general), command 2 (which was my command) consisted of 6 elephant (including my general), 4 heavy chariots, 2 light chariot, 3 cavalry and 1 bow. Command 1 consisted of 3 cavalry, 3 auxilia and 2 elephant and 1 elephant general (Porus).
Although my command was the main offensive command, I was only “second” for PIP allocation. We expected action on our right flank and assigned it as the highest priority. Hindsight says this was wise since that command needed to march a long way, over two routes, with elephants and with difficult terrain. Besides, as the defenders, I really wasn’t expected to be “offensive”.
I should also mention another excellent deployment by the Macedonians; the way they deployed their main phalanx was very good and anticipated the use of our elephants.This was not a formation we accounted for in our practice games.
 |
| Macedonian Phalanx |
This helped to protect the artillery from our elephants (any everything else) – and even though pikes are quick-killed by elephants, it would be a tough fight for the elephants with the doubled ranks of pikes adding +3 to the combat rolls.
King Porus ordered me to prevent this formation from defeating my elephants (as the artillery can actually do). I had to assume an “offensive defense”. My elements were deployed as shown below. The lone bow element in my command was deployed alongside the other bows in command 3 and played no part in the battle.
 |
| Deployment Details |
Battle is Joined!
As the Greek pikes and artillery slowly plodded forward, I was to maneuver my cavalry and chariots into position to charge into them so that I contacted each artillery element. Not only would this slow the Greeks down, but we may destroy the artillery. Cavalry of the period is unlikely to win straight-up combat with pikes, but unlike heavier cavalry it can survive contact – even if it means fleeing.
This order also meant that I would completely uncover our left flank, leaving the camp wide open to advance. King Porus correctly noted to me that the Macedonians in command 3 were so far to our left and so slow in movement that they would be too far away to participate in the battle. Indeed, this turned out to be the case as these troops saw no combat at all.
As the phalanx advanced, it wheeled towards my elephants, clearly the Greeks wanted to get the artillery in position to shoot at them. This angled advance meant that my horse had more ground to cover and would not be able to bring both artillery elements to combat. In order to protect the elephants, they held back. The heavy chariots advanced towards Alexander’s command alone in an attempt to engage them as Porus moved around and through the wooded hill. If these Greeks advanced, using the wooded hill to protect their left flank, then only the auxilia under Porus would be able to join the battle as the elephants and horse were committed to going around the terrain.
Following my advance, the disposition in the center looked as depicted below.
 |
| Early Movement |
In subsequent turns, we came to contact.
 |
| Contact! |
However, not begin able to bring the other artillery to combat would almost prove to be my undoing! In the course of subsequent turns, both of the light chariot elements where destroyed by the shooting! One was destroyed outright and the other was forced to recoil into the line of elephants, resulting in their loss!
At this point in the battle, the Greeks had lost one element and the Indians two. My heavy chariots were about to engage Alexander’s men along with some of the bows from our reserve – but no heavy combat had yet occurred in that area of the battlefield. King Porus’ light troops were making headway through the woods but his horse and elephants were a long way away. In fact, these elements would be present at the moment of decision in the battle, but participate only in being present.
A Risky Advance, Moments of Crisis
Seeing that my Elephants would now be shot down, King Porus ordered me to advance them towards the pike and artillery! “Yes”, he said, “you may lose one or two, but you must get them in position to attack the artillery”. What made things worse is that I could only get the center four elephant elements into position owing to either units in the way or flank exposures. So, forward the four elephants went.
On the ensuing Greek turn, the leftmost elephant was killed by the artillery. My line adjusted on my next turn. On the next Greek turn, my elephant survived the artillery fire! Now was my chance! I had an elephant within charge distance of the artillery – with others supporting its flank! My heavy chariots and Porus’ light troops were beginning to bring battle to Alexander’s men, keeping him in his position. This was the moment of crisis for the Greeks! A good turn from the Indians and they were in big trouble!
But, as has happened throughout history, this was the moment that fortune turned against us! The PIP roll for the Indians was 2-1-1! I would only receive 1 PIP. If you play DBA you know that it takes 2 PIPs to move an elephant! I could not attack! The Greeks survived their moment of crisis!
The next Greek turn brought down another of my elephant with the artillery that had just been so fortunate! OK, it was now 4 elements lost to 1 element lost. At 6 elements lost, my command would be demoralized. While that alone would not technically cost us the battle, it would really be the end for the Indians. Momentum had swung, and the Indians were now in crisis.
I had to recall my elephants and I recalled my remaining cavalry, we’d form a line and allow the Gods to determine our fates when the phalanx advanced. I could no longer battle the odds. The Greek line was simply too tough and too well employed by the CSGA members!
Alexander and Porus
This was when the action tilted to the troops under Alexander and my heavy chariots and King Porus’ bowmen and light troops. Through several turns of tough fighting, we began to slowly turn the tide back to favor the Indians. Porus’ bowmen and auxilia combined mightily with the heavy chariots to cause the loss of four elements from Alexander’s command – one more would break the entire Macedonian army.
This was not easy, the Greek knights and Indian chariots pushed each other around for a few turns, and combats were very messy, with flanks and overlaps changing advantages from turn to turn. Although losing the above mentioned four elements during these turns, Alexander handled his men extremely well. There were at least two occasions where Indian losses were very likely but simply did not pan out.
While it can be frustrating at the moment to all of us wargamers, these occasions really can be the hidden gems of our hobby! We thrill at the command of the men, but as with real commanders, we cannot fight the battle for each individual. We can place men to their advantage, but it is their ability and their luck that will ultimately determine their fate. Military history (and sports, too) has a rich history of unexpected outcomes.
The Battle’s End
At this point, the Greeks had lost a total of five elements, with Alexander’s command being one element away from breaking. The Indians had four elements lost, all from my command, which remained two elements away from breaking. The battle would end on one of the funniest things I think I have ever seen.
Porus had maneuvered some auxilia to overlap a close combat of one of my heavy chariots against an element of Greek knights. The combat modifiers were +4 to +2, in my favor. As I, and my able opponent, Doug were about to roll our dice, General Brown initiated the following sequence:
“Wait, Tony, let Doug roll first so that I can psych him into rolling a one” said the General. Doug, promptly rolls a one and groans.
“Now, Tony, you roll and I’ll psych you into rolling a six” the General offered. I promptly rolled a six.
With the Greeks more than doubled, 10 to 3, they were destroyed, winning the battle. I don’t think I have ever seen such a happening! Die rolls called in that manner!
If we map out the movement of the armies during the game, it would look like this:
 |
| Overall Movements |
With the final dispositions resembling this:
 |
| Final Dispositions |
I cannot say too often how much fun I had and how great it was to game and meet the Colorado Springs guys! Although CMH won the battle I describe, the CSGA teams won the trophy and we shall have to look forward to next summer to try to claim it!
With respect to the game I played in, I have to first thank General Brown (King Porus), my teammate, for his expert tutelage. While I know how to employ Napoleonic troops, I know nothing of elephants and pikes! By sending me into the teeth of the Greek army, he helped me learn a lot.
Our opponents were quite good. David, like me, seemed to be a relatively new player, but played very well, he made no mistakes and was devastating my troops with his artillery! Doug, better known in the above as Alexander, gave expert-level advice and averted disaster with cunning maneuvers.
This game was a really close shave and one of the better actions I have had the good fortune to participate in over the years.
I raise my glass in salute to all that participated and hope for more inter-club activities in the future!
OK, pics!


General images of the event...


